GitLab Advanced SAST
- Tier: Ultimate
- Offering: GitLab.com, GitLab Self-Managed, GitLab Dedicated
GitLab Advanced SAST is a static application security testing (SAST) analyzer that uses cross-function and cross-file taint analysis to detect complex vulnerabilities with fewer false positives than traditional SAST.
GitLab Advanced SAST is an opt-in feature. When enabled, GitLab Advanced SAST scans all supported language files using its predefined ruleset, while the SAST analyzer continues to scan other files. Both analyzers can run in parallel. SAST and GitLab Advanced SAST do not have complete parity - each analyzer detects some vulnerabilities the other does not. An automated transition process deduplicates findings when both analyzers detect the same vulnerability.
GitLab Advanced SAST performs deeper analysis than the standard Semgrep-based SAST analyzer. This comprehensive approach can improve accuracy and reduce false positives, but requires more computational resources and longer scan duration.
For an overview, see GitLab Advanced SAST: Accelerating Vulnerability Resolution.
For a product tour, see the GitLab Advanced SAST product tour.
Features
| Feature | SAST | Advanced SAST |
|---|---|---|
| Depth of Analysis | Limited ability to detect complex vulnerabilities; analysis is limited to a single file, and (with limited exceptions) a single function. | Detects complex vulnerabilities using cross-file, cross-function taint analysis. |
| Accuracy | More likely to create false-positive results due to limited context. | Creates fewer false-positive results by using cross-file, cross-function taint analysis to focus on truly exploitable vulnerabilities. |
| Remediation Guidance | Vulnerability findings are identified by line number. | Detailed code flow view shows how the vulnerability flows through the program, allowing for faster remediation. |
| Works with GitLab Duo Vulnerability Explanation and Vulnerability Resolution | Yes. | Yes. |
| Language coverage | More expansive. | More limited. |
Turn on GitLab Advanced SAST
Follow these steps to turn on GitLab Advanced SAST in your project.
Prerequisites:
- The Maintainer or Owner role for the project.
- Turn on the standard SAST analyzer. For details, see SAST prerequisites.
- For GitLab Self-Managed, use a supported GitLab version:
- Minimum version: GitLab 17.1 or later
- Recommended version: GitLab 17.4 or later (includes code-flow view, vulnerability deduplication, and updated templates)
- Template compatibility:
- Stable template: GitLab 17.3 or later
- Latest template: GitLab 17.2 or later
- Do not mix stable and latest templates in the same project
Turn on GitLab Advanced SAST:
-
In the top bar, select Search or go to and find your project.
-
Go to Build > Pipeline editor.
-
Create or edit your
.gitlab-ci.ymlfile. -
Add the appropriate variable to enable Advanced SAST:
-
For all supported languages except C/C++:
GITLAB_ADVANCED_SAST_ENABLED: 'true' -
For C/C++:
GITLAB_ADVANCED_SAST_CPP_ENABLED: 'true'
-
-
Select the Validate tab, then select Validate pipeline.
The message Simulation completed successfully confirms the file is valid.
-
Select the Edit tab.
-
Complete the fields.
-
Select the Start a new merge request with these changes checkbox, then select Commit changes.
-
Complete the fields according to your standard workflow, then select Create merge request.
-
Review and edit the merge request according to your standard workflow, then select Merge.
At this point, GitLab Advanced SAST is enabled in your pipeline. Supported source code is scanned
for vulnerabilities when a pipeline runs. The corresponding job appears in the test stage in your
pipeline.
After completing these steps, you can:
- Learn more about how to evaluate the vulnerability results.
- Review scan performance tips.
- Plan a rollout to more projects.
Vulnerability results
GitLab Advanced SAST vulnerabilities include detailed information to help you assess and remediate security issues. Each vulnerability shows:
- Description: Explains the cause of the vulnerability, its potential impact, and recommended remediation steps.
- Status: Indicates whether the vulnerability has been triaged or resolved.
- Severity: Categorized into six levels based on impact. Learn more about severity levels.
- Location: Shows the filename and line number where the issue was found. Selecting the file path opens the corresponding line in the code view.
- Code flow: The path the data takes from the user input (source) to the vulnerable line of code.
- Scanner: Identifies which analyzer detected the vulnerability.
- Identifiers: A list of references used to classify the vulnerability, such as CWE identifiers, and the IDs of the rules that detected it.
SAST vulnerabilities are named according to the primary Common Weakness Enumeration (CWE) identifier for the discovered vulnerability. For more information on SAST coverage, see SAST rules.
View results
Prerequisites:
- The Security Manager, Developer, Maintainer, or Owner role for the project.
To view vulnerabilities in your pipeline:
- In the top bar, select Search or go to and find your project.
- In the left sidebar, select Build > Pipelines.
- Select the pipeline.
- Select the Security tab.
- Either download results, or select a vulnerability to view its details (Ultimate only).
Code flow
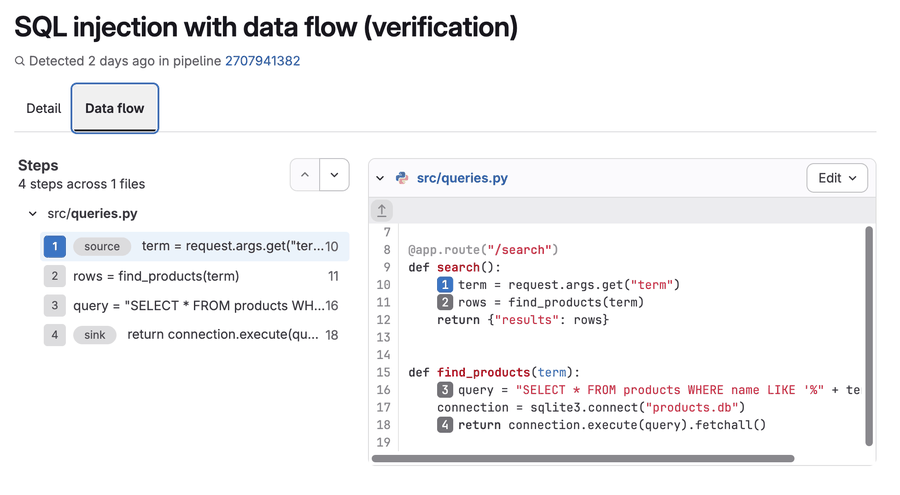
For specific types of vulnerabilities, GitLab Advanced SAST provides code flow information. A vulnerability’s code flow is the path the data takes from the user input (source) to the vulnerable line of code (sink), through all assignments, manipulation, and sanitization. This information helps you understand and evaluate the vulnerability’s context, impact, and risk. Code flow information is available for vulnerabilities that are detected by tracing input from a source to a sink, including:
- SQL injection
- Command injection
- Cross-site scripting (XSS)
- Path traversal
The code flow information is shown in the Data flow tab and includes:
- The steps from source to sink.
- The relevant files, including code snippets.
Supported languages
GitLab Advanced SAST supports the following languages:
- C# (up to and including 13.0)
- C/C++
- Dart (beta)
- Go
- Java, including Java Server Pages (JSP)
- JavaScript, TypeScript
- Kotlin (beta)
- Objective-C (beta)
- PHP
- Python
- Ruby
- Scala (beta)
- Swift (beta)
GitLab Advanced SAST CPP requires additional configuration, including a compilation database. For details, see C/C++ configuration. GitLab Advanced SAST CPP and Semgrep both run for C/C++ projects, each with different rule sets.
Dart, Kotlin, Objective-C, Scala, and Swift support is in
beta.
Analysis runs as a separate CI/CD job, gitlab-advanced-sast-ext, when GitLab Advanced SAST is
enabled and the repository contains files for one of these languages. No additional variable is
required. For Swift and Objective-C, see
Swift and Objective-C configuration.
While a language is in beta, gitlab-advanced-sast-ext runs alongside semgrep-sast and defers to
it for the weaknesses Semgrep already reports for that language, so the same weakness class is not
reported twice. For Kotlin these are CWE-89, CWE-78, CWE-22, CWE-79, CWE-327, and CWE-295. For Swift
it is the Keychain accessibility check (CWE-922). Use GITLAB_ADVANCED_SAST_EXT_DEDUP_LANGUAGES to
change or turn off this behavior.
PHP known issues
When analyzing PHP code, GitLab Advanced SAST has the following known issues:
- Dynamic file inclusion: Dynamic file inclusion statements (
include,include_once,require,require_once) using variables for file paths are not supported in this release. Only static file inclusion paths are supported for cross-file analysis. See issue 527341. - Case sensitivity: PHP’s case-insensitive nature for function names, class names, and method names is not fully supported in cross-file analysis. See issue 526528.
Improve scanning performance
GitLab Advanced SAST scanning performance is determined primarily by code coverage and runner resources. To improve GitLab Advanced SAST scan performance, you can tune code coverage and runner resources.
Diagnose scan performance
Find what is slow before you change any settings. GitLab Advanced SAST can produce two timing artifacts for each scan, which show where scan time goes. These artifacts are not uploaded by default.
To collect them, add the paths to the job’s existing artifacts configuration in your
.gitlab-ci.yml file:
gitlab-advanced-sast:
  artifacts:
    paths:
      - '**/scan_metrics.csv'
      - '**/lightz_times.json'
    when: always
If you already override artifacts for this job (for example, for incremental scanning), add these
paths to the existing artifacts.paths list. Adding a second gitlab-advanced-sast block can drop
other artifacts, such as the SAST report.
scan_metrics.csv and lightz_times.json contain timing information for each rule and file. You can use
this information to find which rules and files take the most time to scan. scan_metrics.csv is sortable in a
spreadsheet by its timing column. lightz_times.json holds more detailed timing for each file that
GitLab Support can help interpret. The analyzer produces these artifacts only when the job completes
successfully. A job that times out does not produce them. If your job is timing out, first raise
the job timeout so a scan can complete, then collect the
artifacts.
After you identify the slowest rules and files, you can exclude paths or disable specific rules.
Tune code coverage
Code coverage refers to how much of your codebase is analyzed. GitLab Advanced SAST scans all supported language files by using its predefined ruleset. The Semgrep-based SAST analyzer does not scan these files. An automated transition process removes duplicate findings when both analyzers detect the same vulnerability.
You can optionally report unverified vulnerabilities, where the full path from source to sink is not identified.
By default, GitLab Advanced SAST scans the entire repository. You can tune code coverage by using the following methods:
- Exclude repository paths to reduce the amount of code analyzed.
- Exclude individual lines using inline comments to suppress specific findings.
- Turn on diff-based scanning to analyze only the files modified in a merge request (and their dependent files).
- Turn on incremental scanning, which caches the results of prior scanning and so reduces the computational load.
Diff-based scanning and incremental scanning can be used independently or together to improve scan performance.
- Diff-based scanning
- Scans only changed files and their dependents in merge request associated pipelines (merge request pipelines or branch pipelines associated with a merge request), trading full coverage for speed.
- Incremental scanning
- Caches prior scan results and reuses them in subsequent pipelines, reducing scan duration while maintaining full file coverage. Available in all pipelines.
| Configuration | Merge request associated pipelines | All other pipelines |
|---|---|---|
| No optimization | Standard. Scans all files, no cache. | Standard. Scans all files, no cache. |
| Incremental scanning only | Fast. Scans all files with cache. | Fast. Scans all files with cache. |
| Diff-based scanning only | Faster. Scans only changed files, no cache. | Standard. Scans all files, no cache. |
| Diff-based + incremental scanning | Fastest. Scans only changed files with cache. | Fast. Scans all files with cache. |
Exclude paths
To reduce scan duration, exclude from GitLab Advanced SAST scanning any paths that are unlikely to contain vulnerabilities.
When excluding paths, be selective to avoid hiding vulnerabilities. Make changes incrementally and test the effect on scan duration after each exclusion.
GitLab Advanced SAST excludes many common paths by default, including tests, node_modules,
vendor, and build output. Use SAST_EXCLUDED_PATHS for additional paths specific to your
project that the defaults do not cover.
Consider excluding paths containing the following:
- Database migrations
- Unit tests
- Dependencies, such as
node_modules/ - Build files
- Configuration information
- Static assets
- Test data
- Infrastructure-as-code
To identify exclusion candidates, list your repository’s file-type distribution:
git ls-files | grep -o '\.[^.]*$' | sort | uniq -c | sort -nrBundled UI dependencies are common candidates. For example, excluding swagger-ui or
swagger-ui-dist/ directories can reduce scan time, because their bundled files inflate it.
The wildcard pattern **/*.min.js also excludes minified content.
Prerequisites:
- The Maintainer or Owner role for the project.
To exclude paths:
- List the excluded paths in the
SAST_EXCLUDED_PATHSCI/CD variable.
After you add exclusions, compare the finding count with a previous full scan. A drop can indicate that you excluded paths that contained real code. Review what each pattern removed and narrow the exclusions if needed.
Finding counts do not map directly to the number of files excluded. Judge by which paths a change
affected rather than by the totals. Expect some run-to-run variation, because under load, a rule that
reaches its timeout for each file (GITLAB_ADVANCED_SAST_RULE_TIMEOUT) can be skipped.
A persistent drop tied to specific excluded paths is more likely to indicate lost coverage.
Exclude lines
To suppress findings on a specific line, add gitlab-advanced-sast-exclude to your source code as a
comment. The tag is case-insensitive and works with any comment syntax, for example #, //, or --.
Place the comment either on the same line as the finding, or on the line immediately before it:
# Suppress all findings on the next line (previous-line comment):
# gitlab-advanced-sast-exclude
result = db.execute(query)

# Suppress all findings inline:
result = db.execute(query)  # gitlab-advanced-sast-exclude
To suppress findings from specific rules only, append : or = followed by one or more rule IDs
separated by commas:
# gitlab-advanced-sast-exclude: rule-id-1, rule-id-2
result = db.execute(query)
When no rule IDs are specified, all findings on that line are suppressed.
Diff-based scanning
Diff-based scanning analyzes only the files modified in a merge request, along with their dependent files. This targeted approach reduces scan duration, resulting in faster feedback during development.
To ensure complete coverage, a full scan runs on the default branch after the merge request is merged.
Diff-based scanning is supported in both merge request pipelines and branch pipelines, under the following conditions:
- Merge request pipelines: Diff-based scanning occurs when GitLab Advanced SAST is configured to run on merge request pipelines.
- Branch pipelines: Diff-based scanning occurs when there is exactly one open merge request associated with the branch. If there are none or more than one, the scan falls back to a full scan because it cannot determine which commit the branch should be diffed against.
When diff-based scanning is active:
- Only files that were modified or added in the merge request, along with their dependent files, are scanned.
- The job log includes the output:
Running differential scan. (If inactive, it outputs:Running full scan.) - In the merge request security scan report, a dedicated Diff-based tab shows relevant scan findings.
- In the pipeline security tab, an alert labeled Partial SAST report indicates that only partial findings are included.
Diff-based scanning has the following known issues:
- False negatives and positives: Diff-based scanning may not capture the full call graph in the scanned files, which can lead to missed vulnerabilities (false negatives) or resurfacing of resolved ones (false positives). This trade-off reduces scan times and provides faster feedback during development. For comprehensive coverage, a full scan always runs on the default branch.
- C/C++ header file coverage: Diff-based scanning does not fully support C/C++ header files. Vulnerabilities that span both header and source files can be detected, but those located entirely in header files might not be.
- Fixed vulnerabilities not reported: To avoid misleading results, fixed vulnerabilities are excluded in diff-based scanning. Because only a subset of files is analyzed, the complete call graph is not available, making it impossible to confirm if a vulnerability has been fixed. A full scan always runs on the default branch after the merge, where fixed vulnerabilities are reported. As a result, any potential gaps from diff-based scanning are mitigated by the full scan that runs automatically on merges to the default branch, ensuring comprehensive coverage. This layered approach balances fast feedback loops during development with thorough security analysis before code reaches production.
Turn on diff-based scanning
Prerequisites:
- The Maintainer or Owner role for the project.
To turn on diff-based scanning in merge request pipelines:
- Set the
ADVANCED_SAST_PARTIAL_SCANCI/CD variable todifferentialin the project’s.gitlab-ci.ymlfile.
Dependent files
To avoid missing cross-file vulnerabilities beyond the modified files, diff-based scanning includes their immediate dependents. This reduces false negatives while maintaining fast scans, though it may produce imprecise results in deeper dependency chains.
The following files are included in the scan:
- Modified files (files changed or added in the merge request)
- Dependent files (files that import the modified files)
This design helps detect cross-file data flows, such as tainted data moving from a modified function to a caller that imports it.
Files imported by modified files are not scanned because they typically do not impact the behavior or data flow of the modified code.
For example, consider a merge request that modifies file B:
- If file A imports file B, files A and B are scanned.
- If file B imports file C, only file B is scanned.
Incremental scanning
Incremental scanning caches taint signature analysis results between pipeline runs. On subsequent scans, unchanged code reuses cached signatures instead of being reanalyzed, while changed or new code is fully analyzed. This reduces scan times on large codebases where most files don’t change between commits.
Incremental scanning works like this:
- First scan (cold run): The analyzer performs a full analysis and creates a cache of taint
signatures. The cache is stored as a CI artifact (
ts-cache.sqlite.gz). - Subsequent scans (warm runs): The analyzer searches previous commits for a successful pipeline containing a cache artifact. If found, the cache is fetched and unchanged results are reused. After the scan completes, the updated cache is stored as a new artifact.
If the analyzer cannot retrieve the cache, it runs a full scan and you see no improvement in scan speed. This can happen when:
- No previous pipeline has a cache artifact yet (for example, on the first run).
- The cache artifact expired or falls outside
GITLAB_ADV_SAST_INCR_SCAN_SEARCH_PERIOD. - The job was renamed without setting
GITLAB_ADV_SAST_INCR_SCAN_CUSTOM_JOB_NAME. - The cache exceeds the artifact size limit.
If incremental scanning does not improve scan speed, check the job log for a line that starts with the following. Read the reason after the colon:
Failed to retrieve cache, continuing without cache:Cache invalidation
The cache is invalidated to ensure accuracy while maximizing reuse:
Partial invalidation: only affected entries are recomputed, the rest of the cache is reused:
- New or changed files: When a file is added, modified, deleted, or renamed, its cached signatures are invalidated and recomputed on the next scan.
- New or changed rules: When detection rules are added or modified, only those specific rules are recomputed against the codebase.
Full invalidation: the entire cache is rebuilt:
- Engine changes: When engine-level changes make the existing cache incompatible, a new cache is generated automatically from a full scan.
Turn on incremental scanning
To turn on incremental scanning:
-
Set the
GITLAB_ADV_SAST_INCR_SCANCI/CD variable totruein the project’s.gitlab-ci.ymlfile:gitlab-advanced-sast: variables: GITLAB_ADV_SAST_INCR_SCAN: "true"
Configure cache retention
The SAST CI/CD template stores the cache artifact with a default expiry of 3 days. The
GITLAB_ADV_SAST_INCR_SCAN_SEARCH_PERIOD variable controls how far back the analyzer searches for a
cache artifact (default: 3 days).
These two values should be aligned. The search period should not exceed the artifact expiry, or the analyzer may search for artifacts that have already expired.
To customize both values, override the artifacts:expire_in and set the search period variable:
gitlab-advanced-sast:
  variables:
    GITLAB_ADV_SAST_INCR_SCAN: "true"
GITLAB_ADV_SAST_INCR_SCAN_SEARCH_PERIOD: "7 days"
artifacts:
paths:
- gl-sast-report.json
- ts-cache.sqlite.gz
expire_in: 7 daysThe search period supports a number followed by d, day, or days (for example, 7 days,
14d).
Configure custom job name
The analyzer uses the CI/CD job name to identify which job’s artifacts contain the cache. If you rename
the gitlab-advanced-sast job, set GITLAB_ADV_SAST_INCR_SCAN_CUSTOM_JOB_NAME to the custom name
so the cache lookup finds the correct job:
my-custom-sast-job:
  variables:
    GITLAB_ADV_SAST_INCR_SCAN: "true"
    GITLAB_ADV_SAST_INCR_SCAN_CUSTOM_JOB_NAME: "my-custom-sast-job"
Cache size limits
The cache is stored as a compressed CI/CD artifact. Artifact size limits apply:
- GitLab.com: 1 GB maximum artifact size.
- GitLab Self-Managed: 100 MB default maximum artifact size. An administrator can adjust this limit in CI/CD settings.
Store cache in external object storage
As an alternative to CI/CD artifact storage, you can store the incremental scanning cache in external object storage. Use this storage method when artifact storage limits are a constraint or when you want to manage cache lifecycle independently. AWS S3 is supported.
Authentication uses OpenID Connect (OIDC) to exchange short-lived tokens with your cloud provider. You do not need to store long-lived credentials as CI/CD variables.
Prerequisites:
- An S3 bucket.
- An IAM OIDC identity provider configured for GitLab.
- An IAM role with the following permissions on the bucket:
s3:GetObjects3:PutObjects3:HeadObject
- The IAM role’s trust policy should be scoped to the projects or groups that require access
(for example,
project_path:myorg/*for all projects in a group).
To store the cache in S3:
-
Add this configuration to your
.gitlab-ci.yml:gitlab-advanced-sast: id_tokens: GITLAB_ADV_SAST_INCR_SCAN_OIDC_TOKEN: aud: https://gitlab.com variables: GITLAB_ADV_SAST_INCR_SCAN: "true" GITLAB_ADV_SAST_INCR_SCAN_STORAGE: "s3" GITLAB_ADV_SAST_INCR_SCAN_S3_BUCKET: "advanced-sast-cache" GITLAB_ADV_SAST_INCR_SCAN_S3_REGION: "us-east-1" GITLAB_ADV_SAST_INCR_SCAN_S3_ROLE_ARN: "arn:aws:iam::<account-id>:role/<role-name>" -
For GitLab Self-Managed or GitLab Dedicated, replace
aud: https://gitlab.comwith your GitLab instance URL. -
Configure an S3 lifecycle policy to auto-expire cache objects.
The expiry should be aligned with the
GITLAB_ADV_SAST_INCR_SCAN_SEARCH_PERIODvalue (default: 3 days) to avoid retaining stale cache files.
The cache is stored in S3 at <project-path>/<commit-sha>/ts-cache.sqlite.gz.
The analyzer searches parent commits for the most recent cache, matching
artifact-based caching behavior.
Report unverified vulnerabilities
- Status: Beta
GitLab Advanced SAST uses taint analysis to trace data flows from untrusted sources to vulnerable sinks. By default, the analyzer only reports a vulnerability when it can trace a complete path, which prioritizes accuracy over coverage. To detect more potential data flows, you can enable unverified vulnerabilities. This feature reports findings even when a complete data flow path cannot be established, which increases coverage but may also increase the number of false positives.
When you enable unverified vulnerability reporting, the analyzer also reports findings where a partial taint flow was detected but could not be fully verified from source to sink. These near-miss findings help you identify and proactively fix risky code before it becomes exploitable. Unverified findings are only reported for rules with a security severity of Medium or higher.
Unverified findings are clearly distinguished from fully verified vulnerabilities in the following ways:
- In the pipeline Security tab, the vulnerability description begins with an (Unverified) prefix.
- In the Vulnerability report, unverified findings are similarly prefixed.
- In the Data flow tab, unverified vulnerabilities have no source node. The first node in the flow is a Trace Entry Point, indicating where the partial trace begins.
Turn on unverified vulnerability reporting
To include unverified findings in scan results, set the REPORT_UNVERIFIED_VULNS CI/CD variable
to a truthy value in your .gitlab-ci.yml file:
gitlab-advanced-sast:
  variables:
    REPORT_UNVERIFIED_VULNS: "true"
Enabling unverified vulnerability reporting can significantly increase the number of findings generated by the analyzer. These findings are stored in the vulnerability database and may impact vulnerability management workflows, including triage effort and reporting.
Tune runner resources
Runner resources directly impact scan duration. GitLab Advanced SAST runs checks in parallel by default, which requires multiple CPU cores and a minimum of 4 GB memory per core. Runner resources are detected automatically, but you can tune some settings if needed.
The analyzer determines available CPU and memory according to the following priority:
- GitLab SaaS runner tags (
CI_RUNNER_TAGS):- On GitLab-hosted runners, the analyzer reads the runner tag (for example,
saas-linux-large-amd64) and looks up the known CPU and memory values for that runner type.
- On GitLab-hosted runners, the analyzer reads the runner tag (for example,
- Container resource limits (
/sys/fs/cgroup/cpu.max,/sys/fs/cgroup/memory.max):- On self-managed runners, the analyzer reads container resource limits from Linux cgroups. Only resource limits are reflected in cgroups. Requests are not enforced at the container level and have no effect.
- CI/CD variable overrides (
ADVANCED_SAST_AVAILABLE_CPUS,ADVANCED_SAST_AVAILABLE_MEMORY):- If set, these values override whatever was detected in steps 1 or 2.
If detection fails at steps 1 and 2, the analyzer defaults to 1 core and 4 GB of memory.
To confirm the CPU and memory allocation, view the gitlab-advanced-sast job log and look for the
GitLab Advanced SAST entries. For example:
[INFO] [GitLab Advanced SAST] [2026-03-30T02:38:09Z] ▶ Detected 2 CPU Cores
[INFO] [GitLab Advanced SAST] [2026-03-30T02:38:09Z] ▶ No Memory limit is detected
Recommended starting point
For a large repository with slow scans, start with several CPU cores and enough memory for 4 GB per
core. Then adjust based on the scan duration you observe. For an example configuration, see
configure runner resource settings. Set the job
timeout high enough for a first full scan to complete.
Configure runner resource settings
You can manually tune the analyzer’s CPU and memory settings by using CI/CD variables when:
- cgroup limits are not set on your runner (for example, on bare-metal or unconstrained VMs).
- Detected values do not match your runner’s actual capacity.
- You want to limit the resources the analyzer uses below what’s available.
Use the following CI/CD settings to tune GitLab Advanced SAST runner resources:
ADVANCED_SAST_AVAILABLE_CPUS- Specify CPU cores available to the analyzerADVANCED_SAST_AVAILABLE_MEMORY- Specify total memory available to the analyzerMAX_UNVERIFIED_CORES- Set an upper bound for automatic core detectionDISABLE_MULTI_CORE- Disable multi-core scanning entirely
For self-managed runners, you can use the --multi-core flag in the
security scanner configuration to specify the number of
requested cores.
For more details, see configuration.
To find the optimal configuration for your project, change only one setting at a time and monitor the scan duration.
In the following example, 4 CPU cores and 16 GB of memory are available to the GitLab Advanced SAST analyzer. Each of the 4 workers has 4 GB of memory available.
include:
  - template: Jobs/SAST.gitlab-ci.yml

variables:
  GITLAB_ADVANCED_SAST_ENABLED: 'true'
  ADVANCED_SAST_AVAILABLE_CPUS: '4'
  ADVANCED_SAST_AVAILABLE_MEMORY: '16384'  # 16 GB for 4 cores
Verify runner resource tuning took effect
After you set ADVANCED_SAST_AVAILABLE_CPUS or ADVANCED_SAST_AVAILABLE_MEMORY, confirm the
effective values in the gitlab-advanced-sast job log. The log reports the detected CPU and, when
memory is set, the detected memory. For example:
Detected 2 CPU Cores
Detected 8192 MB of Memory
If the effective values are lower than you requested:
- Confirm the runner’s actual CPU and memory. The analyzer applies your override as set and does
not cap it to the runner’s capacity. A value above the real capacity causes resource
contention rather than a faster scan. For GitLab-hosted runners, see the
hosted runner specifications. On self-managed
runners, check
nprocand the cgroup limits on the runner host. - Confirm the variable is set at the correct scope and that nothing else overrides it.
By default, the analyzer uses at most one core less than MAX_UNVERIFIED_CORES (default 4), so it
uses three cores. This behavior can make the job log show a line like the following even when you have
not changed any settings:
Detected 8 cores but using 3; set --multi-core or MAX_UNVERIFIED_CORES for moreTo use more cores, raise MAX_UNVERIFIED_CORES, or request a specific number with --multi-core
through SAST_SCANNER_ALLOWED_CLI_OPTS:
variables:
  SAST_SCANNER_ALLOWED_CLI_OPTS: "--multi-core 6"
Configuration
You can adjust GitLab Advanced SAST behavior using the following variables:
| CI/CD variable | Default | Description |
|---|---|---|
GITLAB_ADVANCED_SAST_ENABLED |
false |
Enable GitLab Advanced SAST scanning for all supported languages except C and C++. Dart, Kotlin, Objective-C, Scala, and Swift analysis runs as a separate gitlab-advanced-sast-ext job. |
GITLAB_ADVANCED_SAST_CPP_ENABLED |
false |
Enable GitLab Advanced SAST scanning specifically for C and C++ projects. |
GITLAB_ADV_SAST_INCR_SCAN |
false |
Enable incremental scanning to cache taint signatures between pipeline runs. |
GITLAB_ADVANCED_SAST_EXT_INCREMENTAL_ENABLED |
true |
Applies only to the gitlab-advanced-sast-ext analyzer (Swift, Objective-C, Dart, Scala, and Kotlin), which has incremental scanning enabled by default. Set to false to turn it off. Has no effect on repositories without files for those languages. For other languages, use GITLAB_ADV_SAST_INCR_SCAN instead. |
GITLAB_ADVANCED_SAST_EXT_DEDUP_LANGUAGES |
kotlin,swift |
Applies only to the gitlab-advanced-sast-ext analyzer. Comma-separated list of beta languages for which the analyzer defers to semgrep-sast for the weaknesses Semgrep already reports, so they are not reported twice. For Kotlin: CWE-89, CWE-78, CWE-22, CWE-79, CWE-327, and CWE-295. For Swift: the Keychain accessibility check (CWE-922). Set to an empty value to turn the de-duplication off, for example when benchmarking. |
ADVANCED_SAST_PARTIAL_SCAN |
false |
Enable GitLab Advanced SAST diff-scanning mode by setting to differential. |
GITLAB_ADVANCED_SAST_RULE_TIMEOUT |
30 |
Timeout in seconds per rule per file. When exceeded, that analysis is skipped. |
REPORT_UNVERIFIED_VULNS |
false |
Include unverified findings in scan results. Set to true, 1, or True to enable. |
GITLAB_ADV_SAST_INCR_SCAN_SEARCH_PERIOD |
3 days |
How far back to search for a cached taint signature artifact. Supported format: number followed by d, day, or days (for example, 7 days). Should not exceed the artifact expiry period. |
GITLAB_ADV_SAST_INCR_SCAN_CUSTOM_JOB_NAME |
gitlab-advanced-sast |
Custom job name for cache artifact lookup. Set this if you renamed the gitlab-advanced-sast job. |
GITLAB_ADV_SAST_INCR_SCAN_STORAGE |
Not set | Cache storage backend. Set to s3 to store the cache in AWS S3 instead of CI/CD artifacts. For details, see store cache in external object storage. |
GITLAB_ADV_SAST_INCR_SCAN_S3_BUCKET |
Not set | S3 bucket name for cache storage. Required when GITLAB_ADV_SAST_INCR_SCAN_STORAGE is s3. |
GITLAB_ADV_SAST_INCR_SCAN_S3_REGION |
Not set | AWS region of the S3 bucket. Required when GITLAB_ADV_SAST_INCR_SCAN_STORAGE is s3. |
GITLAB_ADV_SAST_INCR_SCAN_S3_ROLE_ARN |
Not set | ARN of the IAM role to assume through OIDC. Required when GITLAB_ADV_SAST_INCR_SCAN_STORAGE is s3. |
GitLab Advanced SAST scanning is disabled by default. To explicitly disable it when enabled at a
higher level (for example, for a group), set GITLAB_ADVANCED_SAST_ENABLED (or
GITLAB_ADVANCED_SAST_CPP_ENABLED for C/C++ projects) to false.
Roll out
After you are confident in GitLab Advanced SAST results for one project, extend it to additional projects and groups. You should create a shared CI/CD configuration that includes GitLab Advanced SAST and enforce it across the desired groups and projects.
For more details, see Security configuration.
Vulnerability detection criteria
GitLab Advanced SAST uses cross-file, cross-function scanning with taint analysis to trace the flow of user input into the program. This ensures that injection vulnerabilities, such as SQL injection and cross-site scripting (XSS), are detected even when they span multiple functions and files.
The analyzer only reports taint-based vulnerabilities when there is a verifiable flow that brings untrusted user input from a source to a point where untrusted data could cause security vulnerabilities. This approach minimizes noise compared to other products that may report vulnerabilities with less validation.
Detection emphasizes input that crosses trust boundaries, like values sourced from HTTP requests, but excludes command-line arguments, environment variables, or other inputs typically provided by the user operating the program.
For details of which types of vulnerabilities GitLab Advanced SAST detects, see GitLab Advanced SAST CWE coverage.
Transitioning from Semgrep to GitLab Advanced SAST
When you migrate from Semgrep to GitLab Advanced SAST, an automated transition process deduplicates vulnerabilities. This process links previously detected Semgrep vulnerabilities with corresponding GitLab Advanced SAST findings, replacing them when a match is found.
After enabling Advanced SAST scanning in the default branch when a scan runs and detects vulnerabilities, it checks whether any of them should replace existing Semgrep vulnerabilities based on the following conditions.
Conditions for deduplication
-
Matching Identifier:
- At least one of the GitLab Advanced SAST vulnerability’s identifiers (excluding CWE and OWASP) must match the primary identifier of an existing Semgrep vulnerability.
- The primary identifier is the first identifier in the vulnerability’s identifiers array in the SAST report.
- For example, if a GitLab Advanced SAST vulnerability has identifiers including
bandit.B506and a Semgrep vulnerability’s primary identifier is alsobandit.B506, this condition is met.
-
Matching Location:
- The vulnerabilities must be associated with the same location in the code. This is determined using one of the following fields in a vulnerability in the SAST report:
- Tracking field (if present)
- Location field (if the Tracking field is absent)
- The vulnerabilities must be associated with the same location in the code. This is determined using one of the following fields in a vulnerability in the SAST report:
Vulnerability changes
When the conditions are met, the existing Semgrep vulnerability is converted into a GitLab Advanced SAST vulnerability. This updated vulnerability appears in the Vulnerability Report with the following changes:
- The scanner type updates from Semgrep to GitLab Advanced SAST.
- Any additional identifiers present in the GitLab Advanced SAST vulnerability are added to the existing vulnerability.
- All other details of the vulnerability remain unchanged.
When the conditions are not met, the existing Semgrep vulnerabilities persist in the vulnerability dashboard even if the underlying code issues have been fixed. To mark these fixed vulnerabilities as resolved in GitLab, you must either manually resolve them in the vulnerability dashboard, or run the Semgrep analyzer again.
Resolve duplicate vulnerabilities
In some cases, Semgrep vulnerabilities may still appear as duplicates if the deduplication conditions are not met. To resolve this in the Vulnerability Report:
- Filter vulnerabilities by Advanced SAST scanner and export the results in CSV format.
- Filter vulnerabilities by Semgrep scanner. These are likely the vulnerabilities that were not deduplicated.
- For each Semgrep vulnerability, check if it has a corresponding match in the exported Advanced SAST results.
- If a duplicate exists, resolve the Semgrep vulnerability appropriately.
Request source code of LGPL-licensed components in GitLab Advanced SAST
To request information about the source code of LGPL-licensed components in GitLab Advanced SAST, contact GitLab Support.
To ensure a quick response, include the GitLab Advanced SAST analyzer version in your request.
Because this feature is only available at the Ultimate tier, you must be associated with an organization with that level of support entitlement.